Skip to content
Back to your program

Nerve Mobility · Phase 1 · Calm

Session 8

Week 2 · Day 3 · Full session · 10 exercises

Before you start

Red Flags: When to Stop and Seek Medical Care

Most back pain is manageable with the right approach. But there are specific symptoms that require immediate medical attention. These are non-negotiable. If you experience any of the following, see a doctor:

• New bladder or bowel problems (difficulty controlling either) • Numbness around the saddle/groin area • Rapidly worsening leg weakness • Unexplained fever, chills, or weight loss • Severe pain after a significant trauma • Feeling physically unsafe

These are rare, but they're serious. Everything else in this program assumes that red flags are not present. If any of these show up at any point, pause the program and get in-person care.

Every session has a “Does this hurt?” button. Tap it if something doesn’t feel right.

This educational content does not constitute medical advice. For diagnosis or treatment, please consult a clinician.

Walking: 12-15 min

Also walk on rest days at the same duration

Today’s exercises

Some soreness during exercise is normal. Sharp, escalating pain is not.

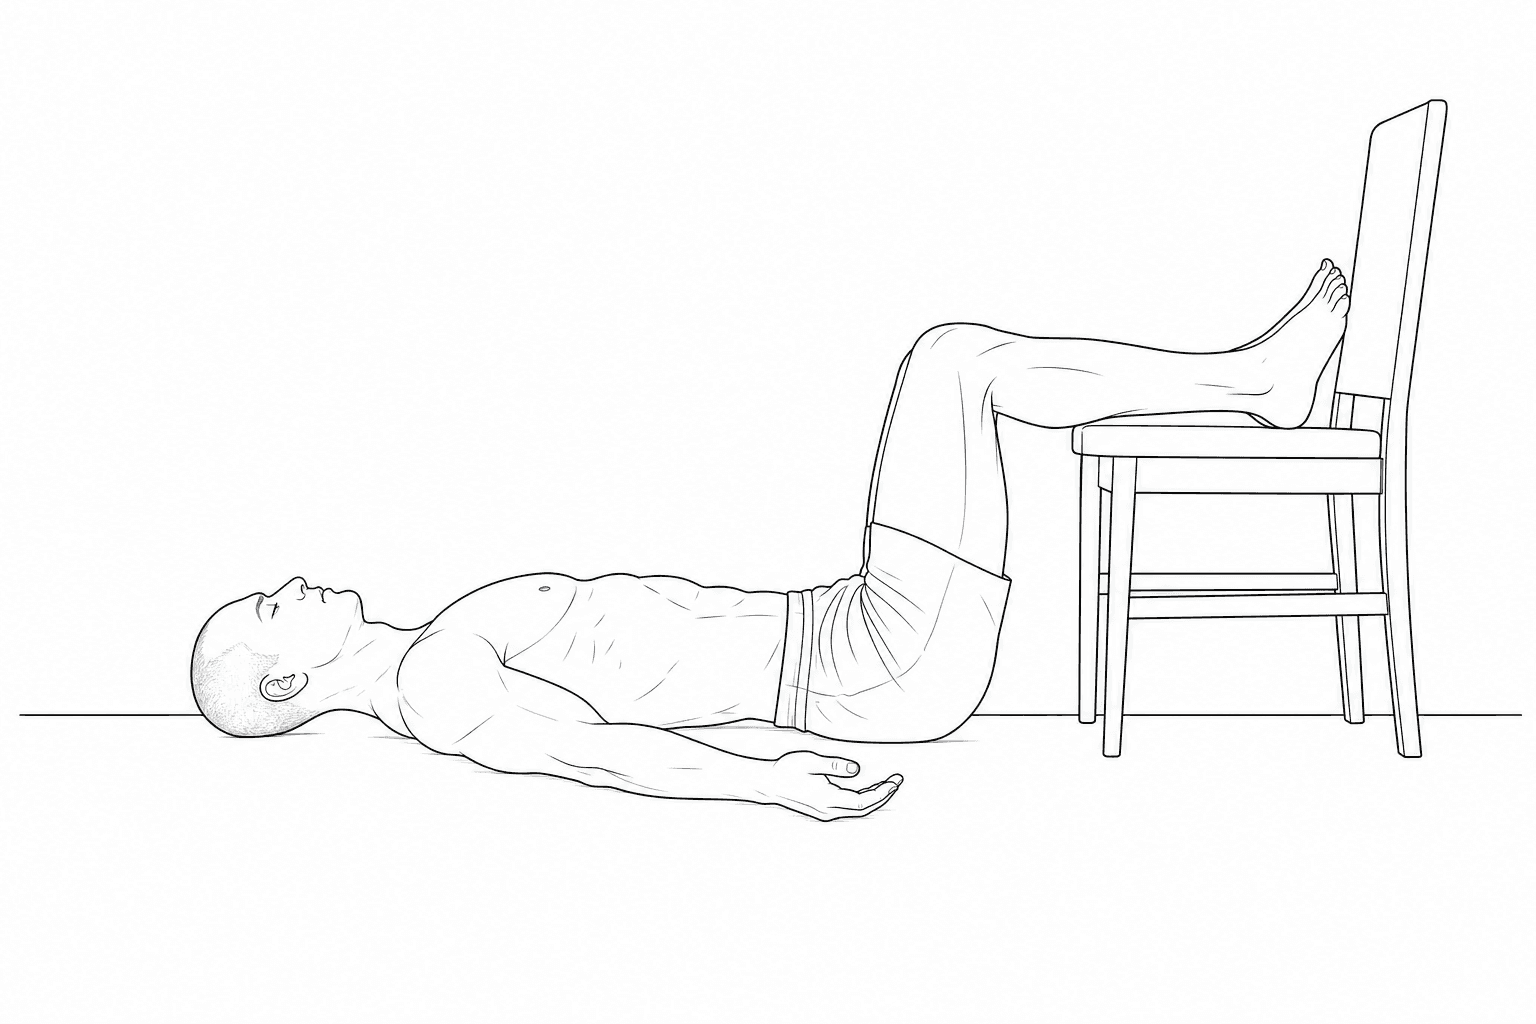
  1. Floor 90-90 decompression

    Exercise 1

    Floor 90-90 decompression

    As needed

    Featured: calves up on a chair/couch, offloads the nerve

    How to do it
    1. 1Lie on your back on the floor in front of a chair, couch, or low bench.
    2. 2Rest your lower legs up on the surface so your hips and knees are both bent to roughly 90 degrees, with your calves and heels supported.
    3. 3Let your low back settle toward the floor and your whole body relax. Your hips should feel completely unloaded.
    4. 4Breathe slowly into your belly and stay here for the prescribed time. If it eases your leg symptoms, great; if it does nothing for you, that's fine too, no position works for everyone.

    Why this exercise

    Lying down takes the compression of standing and sitting off your spine, and resting your calves up slackens the back of your leg, which can take tension off an irritated sciatic nerve. It's not a fix, just smart, comfortable unloading you can reach for whenever your back or leg feels wound up.
  2. Bench / countertop decompression lean

    Exercise 2

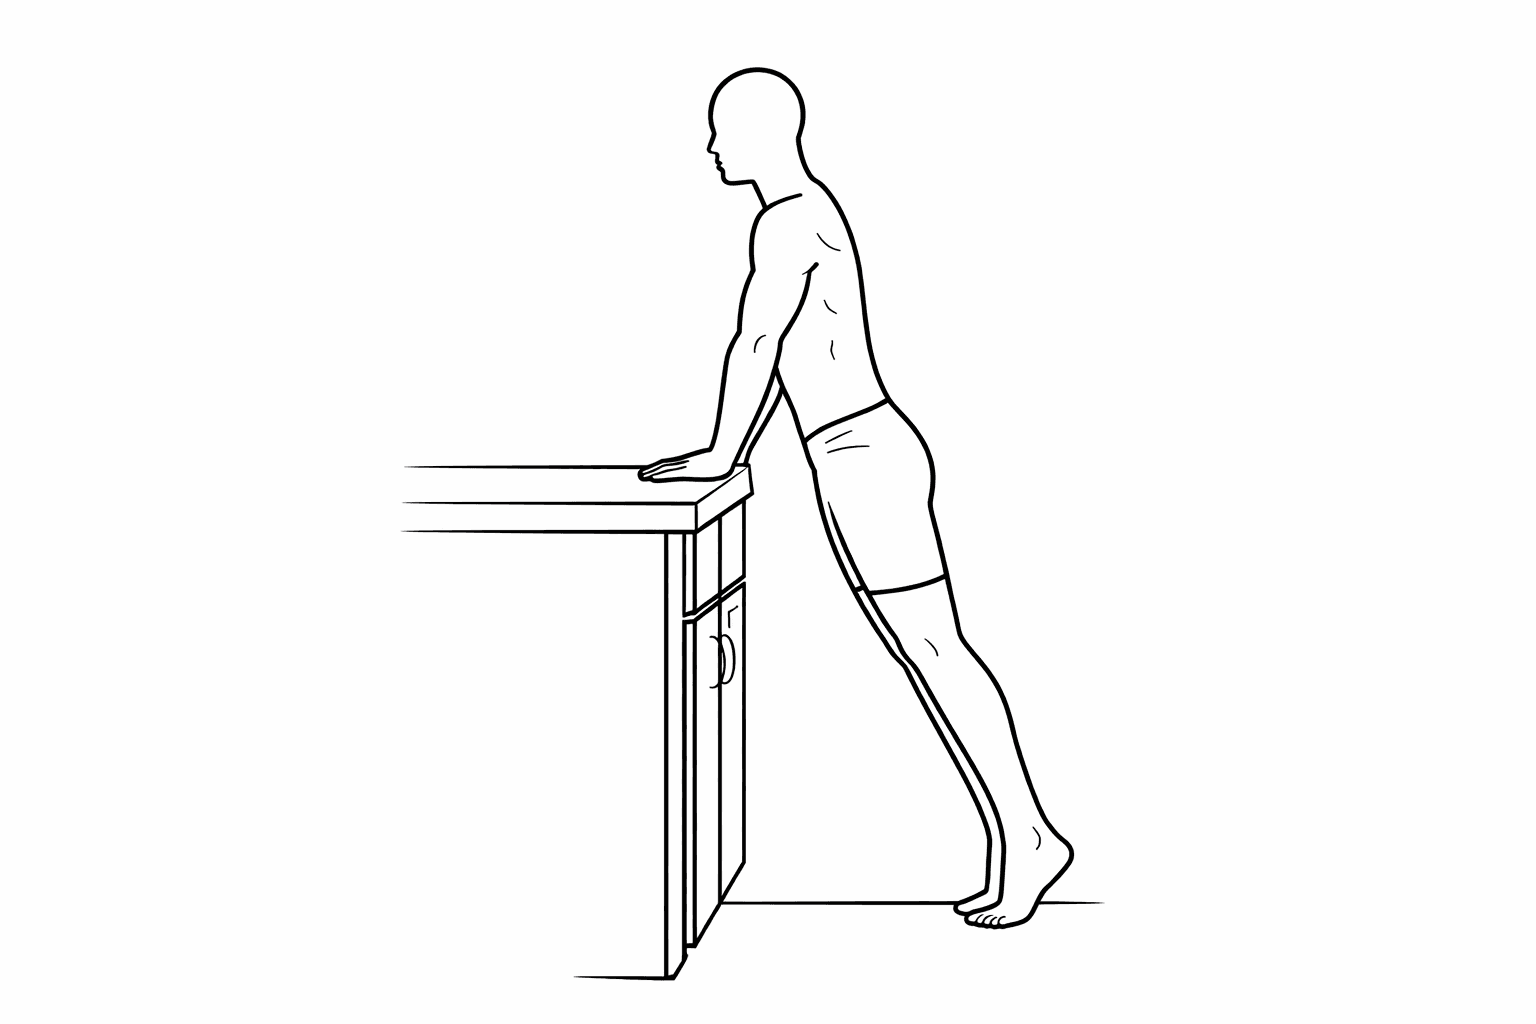
    Bench / countertop decompression lean

    30-60s holds, as needed

    Useful: decompresses the posterior disc off the nerve

    How to do it
    1. 1Stand facing a sturdy bench, table, or countertop that is around hip height.
    2. 2Place your hands or forearms on the surface, then offload your weight onto the supporting surface. I find that it helps to turn my palms facing forward and not let my shoulders shrug.
    3. 3Let your knees soften slightly and allow your arms to support some of your bodyweight. If you're able to and have a stable surface, you may fully offload your weight onto the surface.
    4. 4Breathe slowly and feel your low back gently unload; hold for the prescribed time, then slowly walk your feet back in and stand up tall.

    Why this exercise

    This is your 'reset button.' It gives your back a break from compression and can calm things down after sitting, standing, or a long walk. It's not magic - just smart load management to partially offload compression for temporary relief.

  3. Prone tummy lying (relaxed)

    Exercise 3

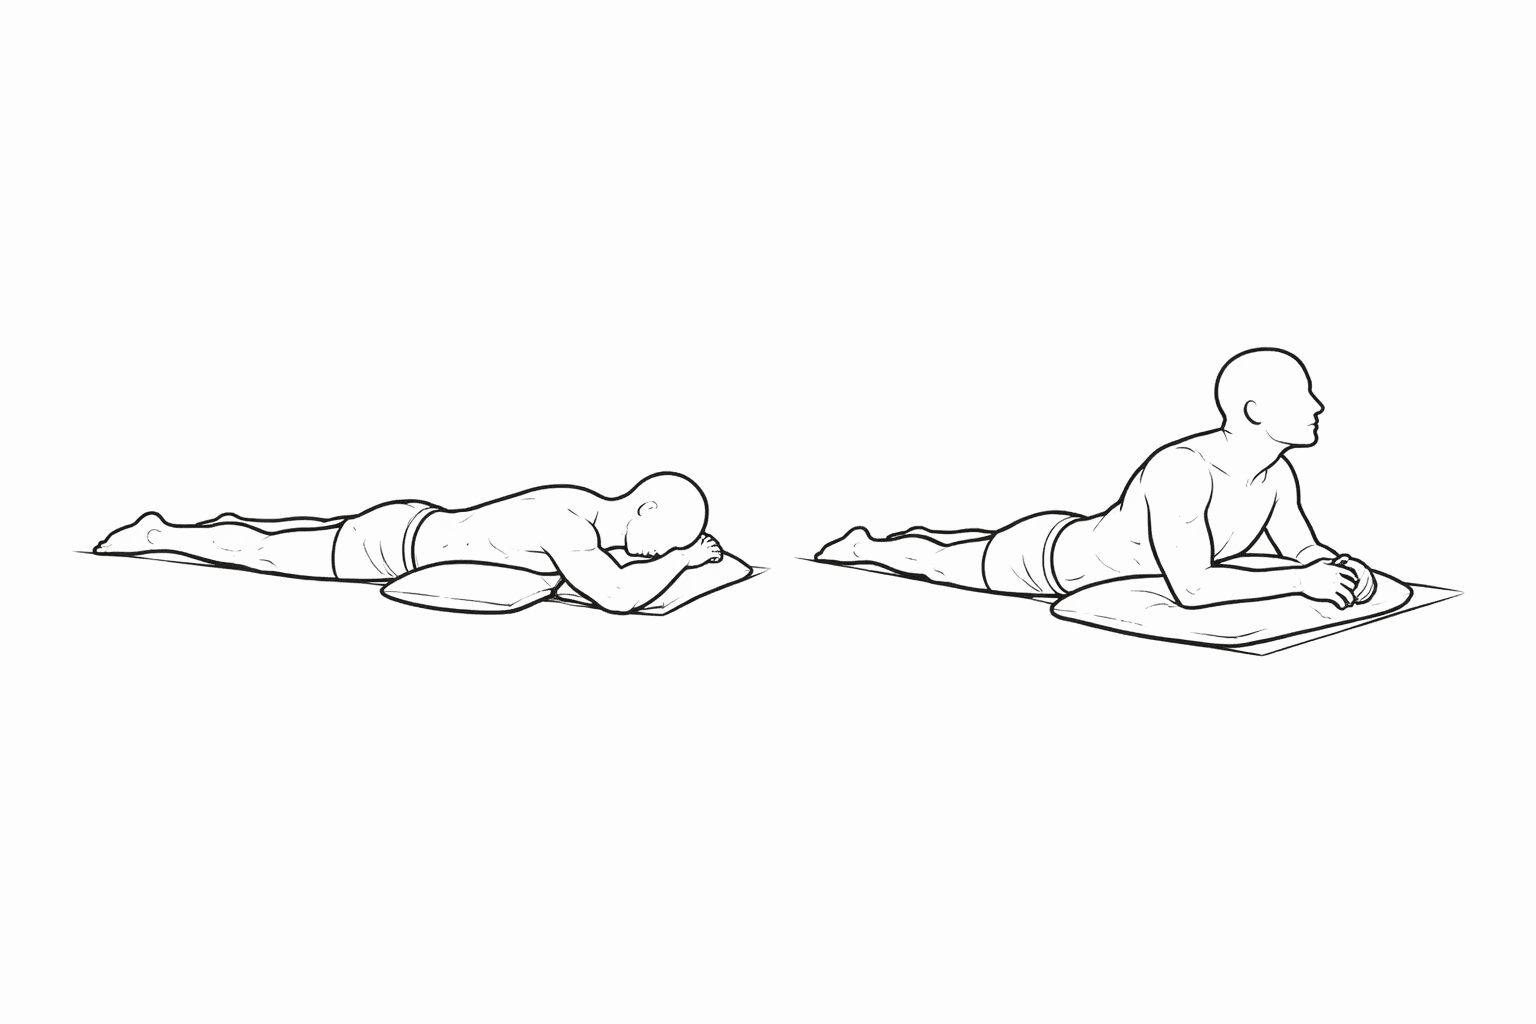
    Prone tummy lying (relaxed)

    ~3 min

    Optional: some people don't get relief from prone or decompression, and that's completely fine. Discontinue if it worsens leg symptoms

    How to do it
    1. 1Lie on your stomach on a firm but comfortable surface, such as a mat or bed.
    2. 2Position a small pillow or folded towel under your hips or chest if that makes the position more comfortable. This helps me a lot as I'm sensitive to extension.
    3. 3Let your legs relax and rest your head in a comfortable position, either turned to one side or supported on your hands.
    4. 4If you're able to, gently begin lifting your head and chest to enter slight extension by resting on your elbow or through the use of a pillow.
    5. 5Breathe slowly into your belly and allow your back and hips to relax, staying in this position for the prescribed time as long as symptoms remain tolerable.

    Why this exercise

    For some people (especially when bending forward aggravates symptoms), gentle extension-biased positions can calm things down. This is the lowest-intensity "try it and see" version. The concept is simple: if forward bending elicits pain, then lying on your tummy passively shifts your nucleus pulposus of your discs anteriorly, giving relief to the posterior structures that may have been compressed by the nucleus. Going into extension further exaggerates this and can provide additional relief to some.

    Make it easier

    • Pillow under hips/chest
    • Shorter time

    Make it harder

    • Gradually reduce pillow height
    • Move to elbows (small extension) if tolerated
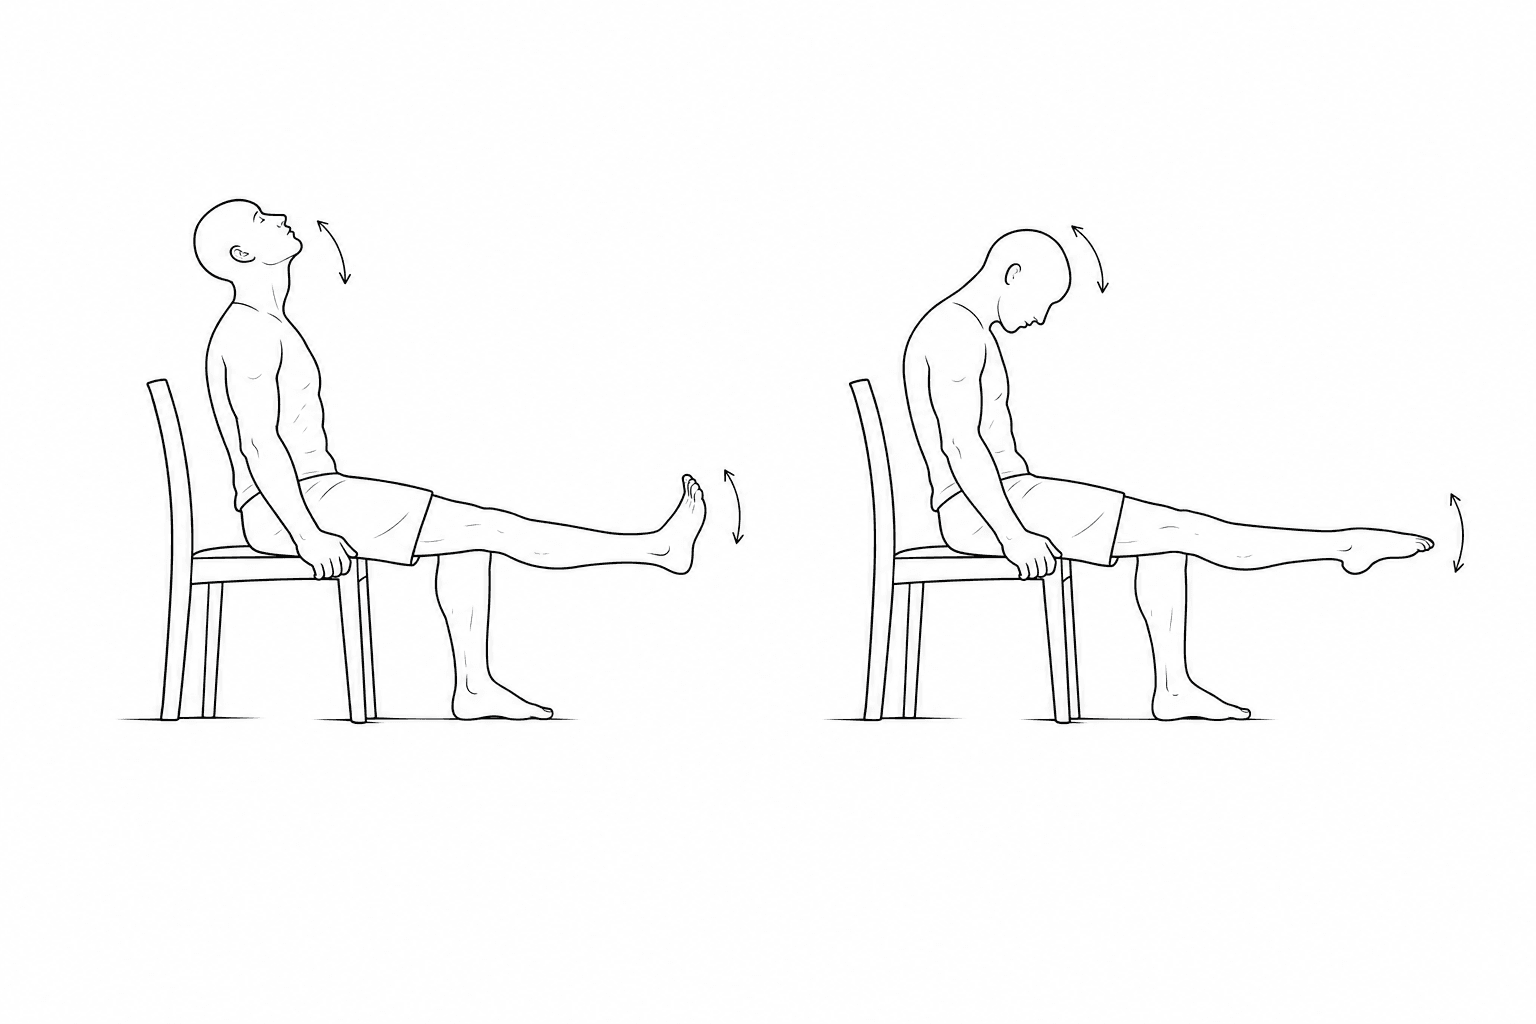
  4. Seated sciatic nerve slider

    Exercise 4

    Seated sciatic nerve slider

    20+ slow reps/side, 1-2×/day

    Your cornerstone from day one. Ankle and chin move together: toes pull back as the chin lifts, toes point as the chin drops. Can't comfortably hold your leg up? Swap in the lying slider: same drill, with the floor doing the holding. ⚠️ Peripheralizing (symptoms moving DOWN the leg) → stop. Centralizing (retreating toward the spine) → continue. Progressive weakness, saddle numbness, or bladder/bowel changes → seek medical care.

    How to do it
    1. 1Sit tall near the front edge of a chair with both feet flat on the floor.
    2. 2Bring your leg and chin up together: straighten your working leg out in front of you while you lift your chin and look up. The leg stays extended from here on.
    3. 3Now sync your ankle and your head. Pull your toes back toward you as your chin lifts up, then point your toes away as your chin drops down toward your chest.
    4. 4Repeat that rhythm, slow and steady, for 20 or more reps, then switch legs. The rhythm matters more than the range: ankle and chin move together, like they're on the same string.
    5. 5STOP rule: if symptoms spread further DOWN your leg (peripheralizing), stop for the day. If they draw back UP toward your spine (centralizing), continue. Progressive weakness, saddle or groin numbness, or any bladder or bowel changes mean stop and seek medical care.

    Why this exercise

    This is the preferred slider because the synchronized head movement keeps neural tension low. When your toes pull back, the nerve is tugged from the bottom end; lifting your chin at that same moment feeds in slack from the top, so the nerve slides through its path instead of being stretched at both ends. Floss sliding back and forth, not a rope pulled tight.

    Make it easier

    • Can't hold your leg up comfortably? Use the lying slider instead; the floor does the holding.
    • Soften the knee; the leg doesn't need to be perfectly straight.
    • Smaller ankle and head movements.

    Make it harder

    • More reps (25-30 per leg) before anything else.
    • A slightly straighter knee, only if symptoms stay calm.
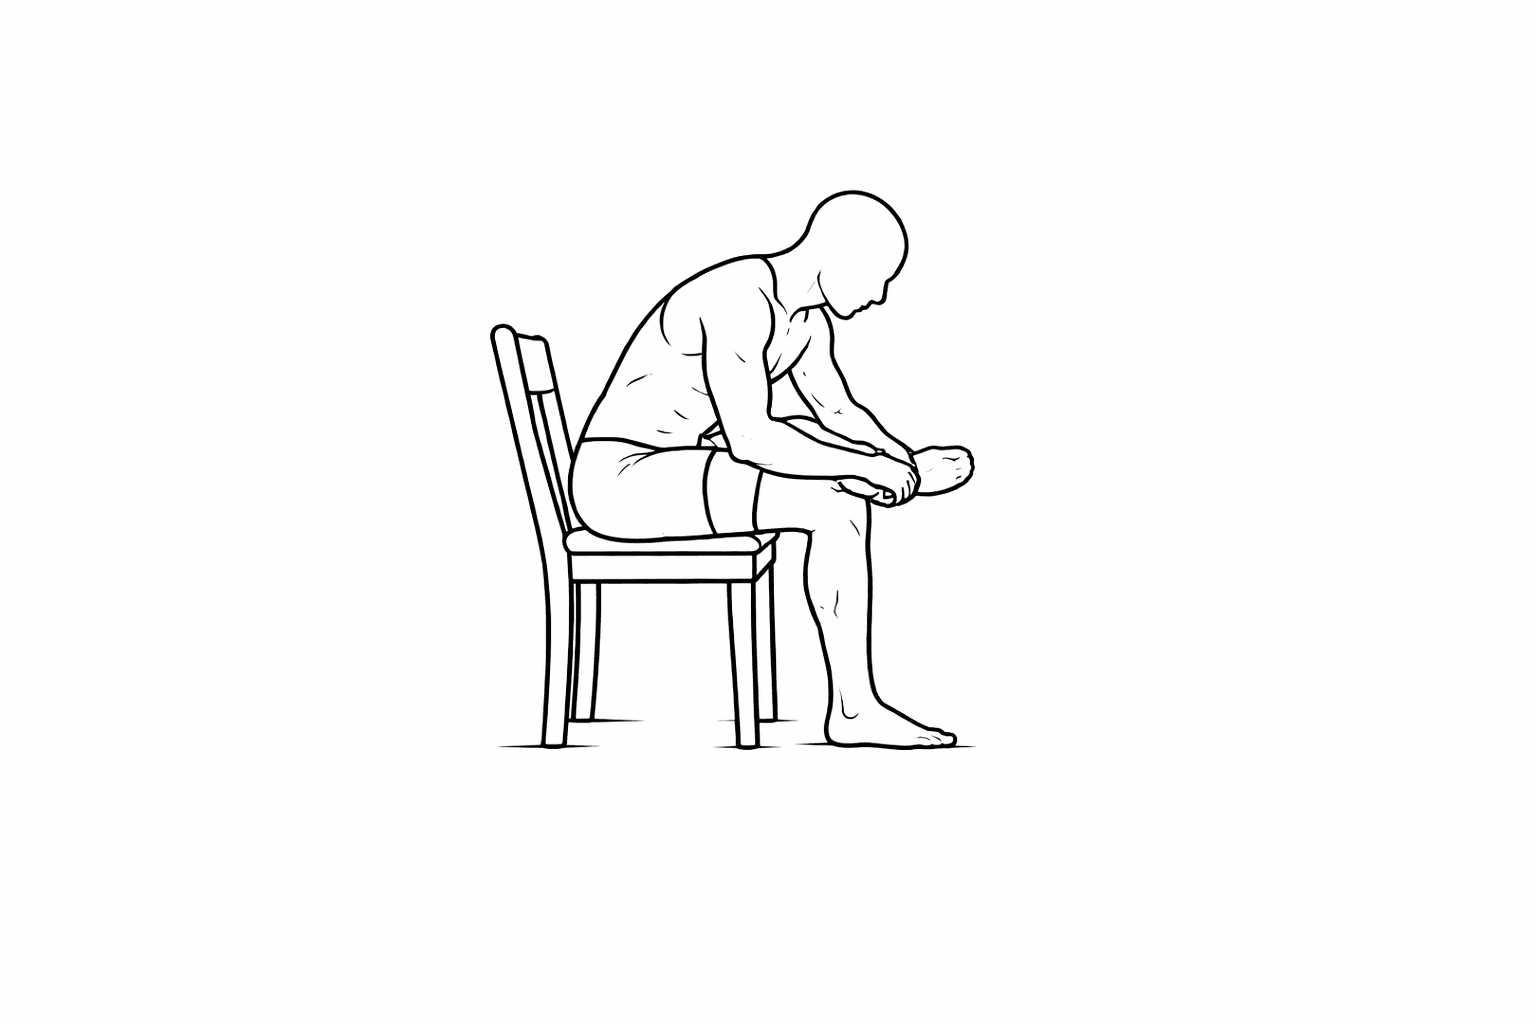
  5. Figure-4/piriformis stretch

    Exercise 5

    Figure-4/piriformis stretch

    1 × 20-30s/side

    Safe: bent knee + neutral spine slackens the nerve

    How to do it
    1. 1Sit on a chair or lie on your back with both knees bent.
    2. 2Cross one ankle over the opposite knee so your leg forms a "figure-4" shape.
    3. 3Gently lean your trunk forward (if sitting) or draw the uncrossed leg toward your chest (if lying down) until you feel a stretch in the buttock and outer hip of the crossed leg.
    4. 4Hold for the prescribed time without bouncing, then relax and repeat on the other side.

    Why this exercise

    This is a personal favourite of mine, and I swear by performing this daily. This is a common stretch recommended to those with sciatica as the piriformis muscle sits right near the sciatic nerve (and for some poor people, the nerve runs right through the piriformis muscle). Stretching this muscle may help with nerve compression. This stretch reduces tension in the piriformis, hip extensors, and external rotators.

    Make it easier

    • Do it lying down on your back (often easier to control)
    • Don't lean your torso into the stretch very much
    • Shorter holds

    Make it harder

    • Slightly deeper stretch over time (lean deeper with torso)
    • Longer holds
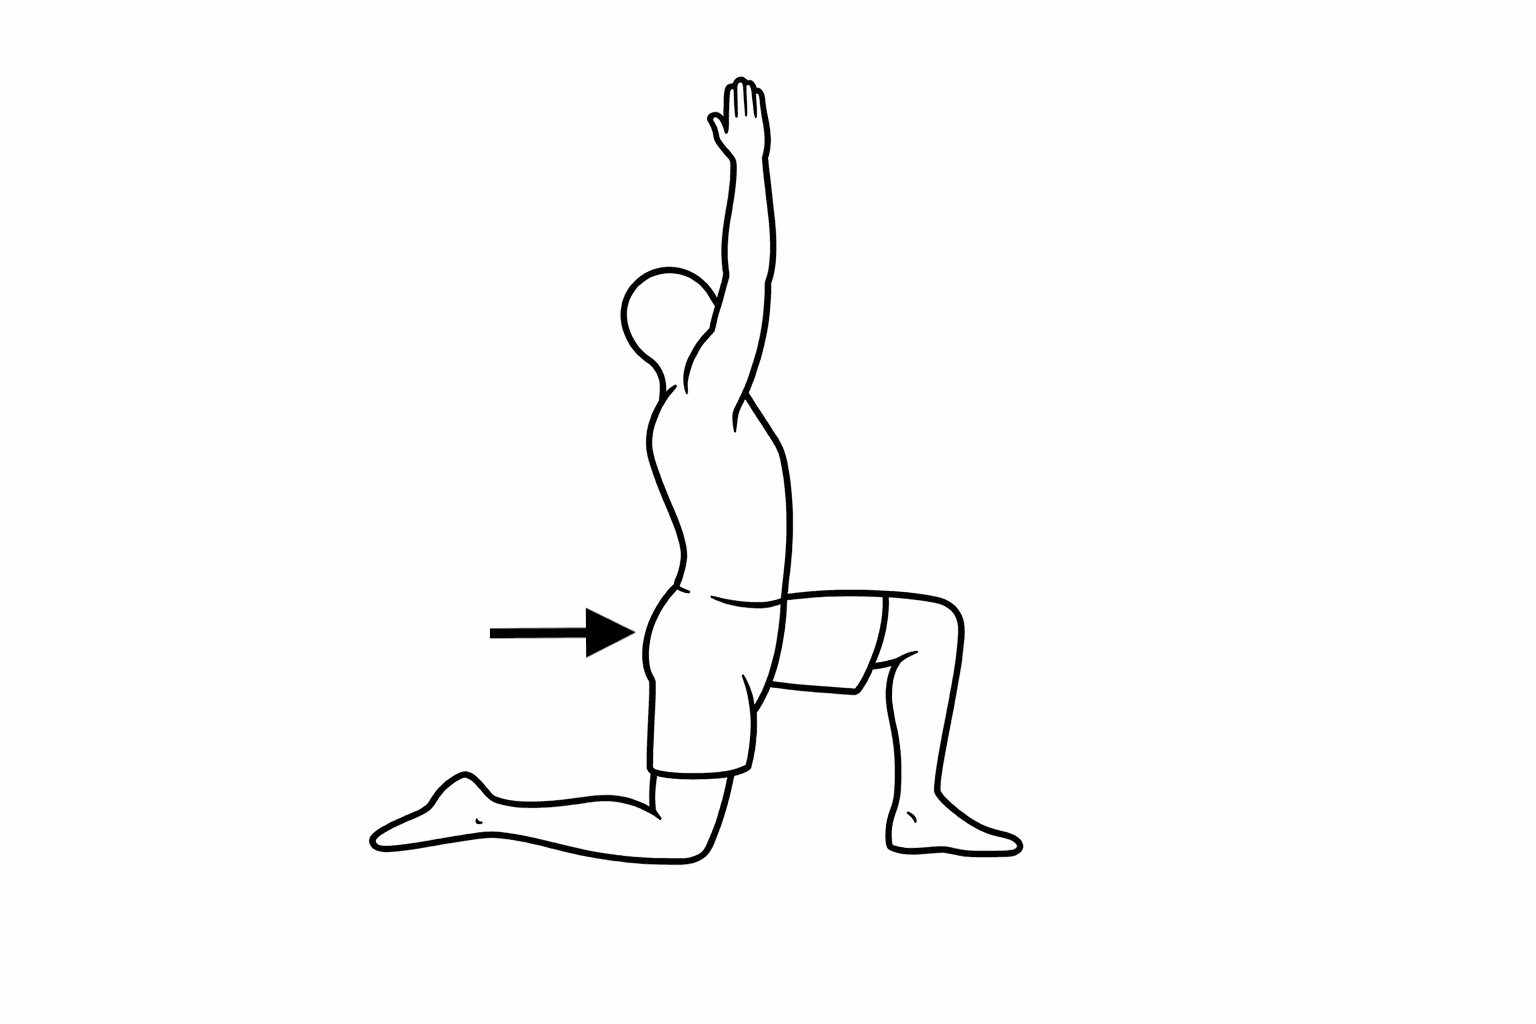
  6. Hip flexor stretch (half-kneeling)

    Exercise 6

    Hip flexor stretch (half-kneeling)

    1 × 20-30s/side

    Safe: ribs down, don't arch

    How to do it
    1. 1Kneel on one knee with the other foot flat in front of you, both knees at roughly 90 degrees.
    2. 2Squeeze the glute of your kneeling leg, tighten your lower abs, and push your pelvis forward slightly. Don't arch your back. Stay upright.
    3. 3Lift the arm on your kneeling-leg side straight up toward the ceiling, keeping your ribs down.
    4. 4Lean slightly deeper into the stretch (pain permitting) while maintaining a neutral spine. A subtle lean toward the opposite side can increase the stretch.

    Why this exercise

    Tight hip flexor muscles can pull your spine into extension. The psoas major in particular can pull your lumbar spine into excessive arching (hyperlordosis) and contribute to anterior pelvic tilt. Reducing tension in the hip flexors helps reduce this pull on the spine.

    Make it easier

    • Keep your arm down instead of reaching overhead
    • Decrease depth of the stretch

    Make it harder

    • Increase depth of the stretch
    • Reach and lean farther
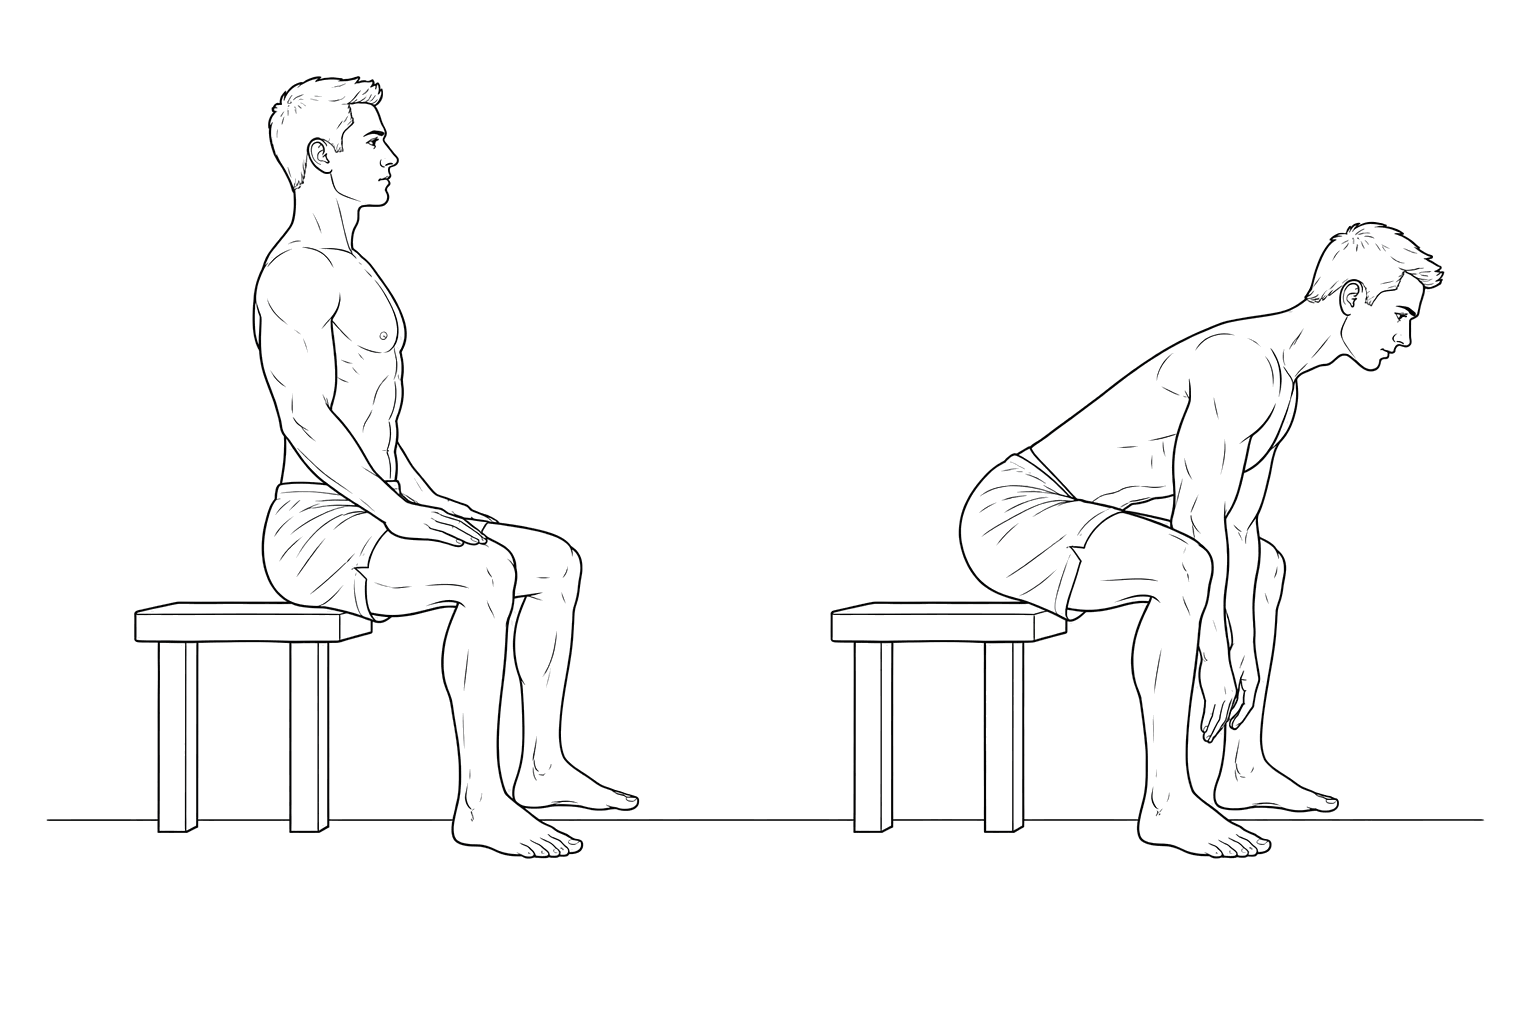
  7. Seated good morning

    Exercise 7

    Seated good morning

    2 × 8

    Erector anchor: hands on thighs, partial lean, STRICTLY neutral spine, do NOT round

    How to do it
    1. 1Sit tall on a flat bench or the edge of a firm chair with your feet wide apart and knees bent so that your heels are roughly beneath your knees.
    2. 2Breathe in and brace your core.
    3. 3Hinge forward slowly while maintaining your brace and a neutral spine.
    4. 4Fight to keep a straight back and stop the movement when you feel that your back may begin to round.
    5. 5Drive down through your feet and push your hips forward into the bench to return to the starting position.

    Why this exercise

    A seated position increases stability and lets you build confidence with hinging at the hips before you try it standing. The extra stability means 100% of your attention can go to moving through the hips with a locked, neutral spine.

    Make it easier

    • Micro-hinge: lean only as far as stays comfortable, build over time
    • Rest your hands on your thighs to support your torso
    • Drop down a rung of the lever ladder

    Make it harder

    • Climb the lever ladder (longer lever = harder): (1) hands on thighs
    • Arms crossed on your chest
    • Hands behind your head (do not push your chin down)
    • Hug a weighted object to your chest (a book, water jug, or filled bag)
    • Increase the depth of the hinge (back must not round into flexion)
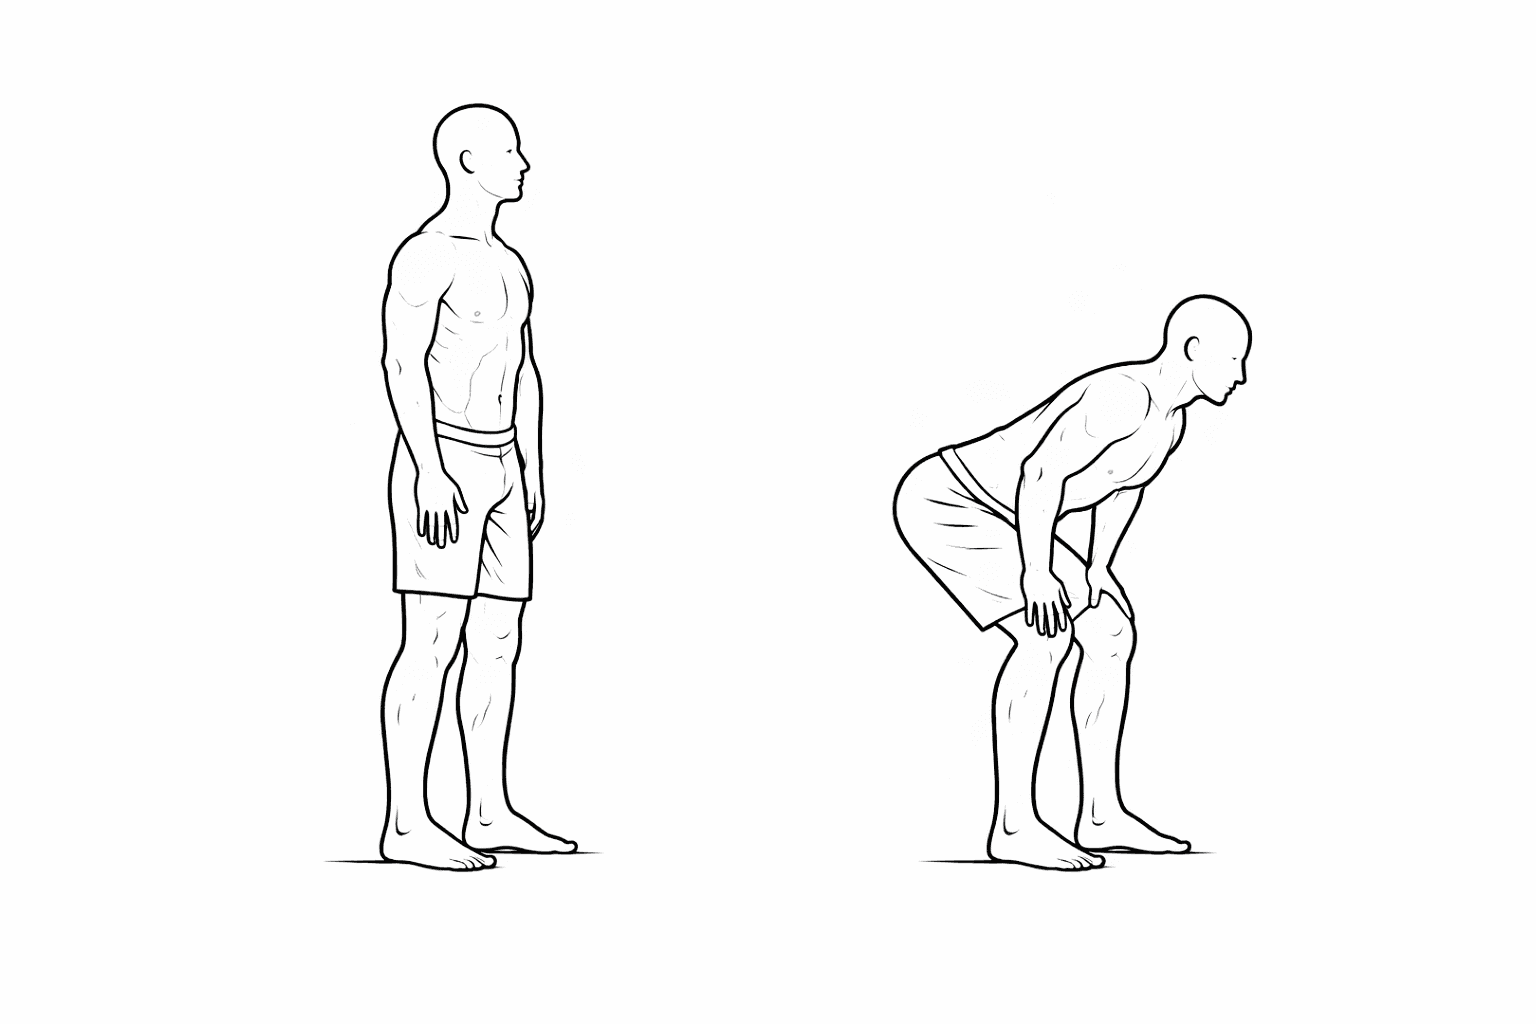
  8. Bodyweight hip hinge (hands on thighs)

    Exercise 8

    Bodyweight hip hinge (hands on thighs)

    2 × 8 (braced, strictly neutral spine)
    How to do it
    1. 1Stand with your feet about hip-width apart and knees slightly bent.
    2. 2Place your hands lightly on the tops of your thighs and gently brace your core.
    3. 3Push your hips back behind you slowly and slide your hands down your thighs for support. Imagine you are closing a car door with your butt, letting your chest tip forward while keeping your back straight.
    4. 4Stop when you feel a stretch in your hamstrings or if you notice your back beginning to round, then return to standing by driving your hips forward and straightening your legs.

    Why this exercise

    This is a skill drill, not a workout. It teaches you how to bend using hips and legs while keeping your trunk stable - basically the foundation for picking things up without relying on rounding your spine into flexion.

    Make it easier

    • Smaller hinge (hands don't slide far)
    • Practice against a wall (hips tap wall)

    Make it harder

    • Deeper hinge while staying neutral (spine)
    • Remove hand support gradually
    • Hold a light object, once the pattern is automatic
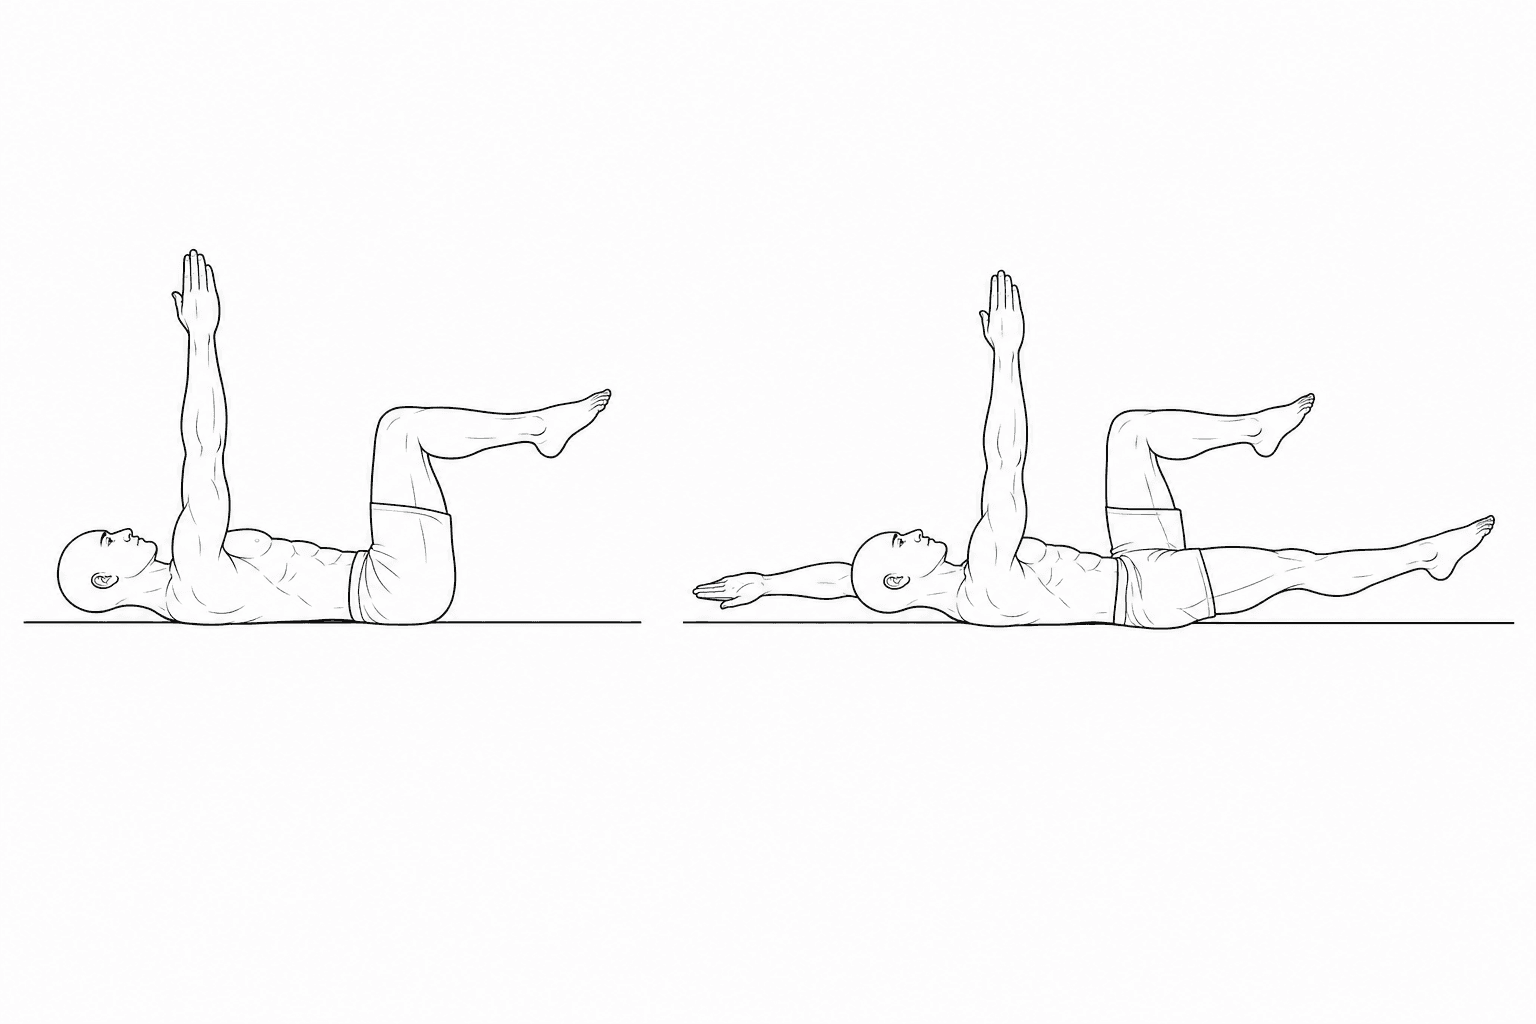
  9. Dead bug

    Exercise 9

    Dead bug

    2 × 3/side × 3-5s hold

    Lower the opposite arm + leg slowly, keep the low back gently flat

    How to do it
    1. 1Lie on your back with your arms reaching straight up toward the ceiling and your hips and knees bent to 90 degrees, so your shins are parallel to the floor.
    2. 2Gently flatten your low back toward the floor and brace your core, holding that contact the whole time.
    3. 3Slowly lower one arm overhead and the opposite leg toward the floor, going only as far as you can while keeping your low back flat.
    4. 4Return to the start with control and repeat on the other side, breathing steadily and moving slowly throughout.

    Why this exercise

    The dead bug trains your core to lock your spine in place while your arms and legs move, without loading your back. It is the anti-arch counterpart to the bird dog.

    Make it easier

    • Move only the legs, or only the arms
    • Shorten the range (lower the limb part-way)
    • Fewer reps

    Make it harder

    • Standard dead bug (lower one arm and the opposite leg, then return)
    • Same movement with a 3-second pause at full extension before returning
    • More reps once your low back stays flat the whole set
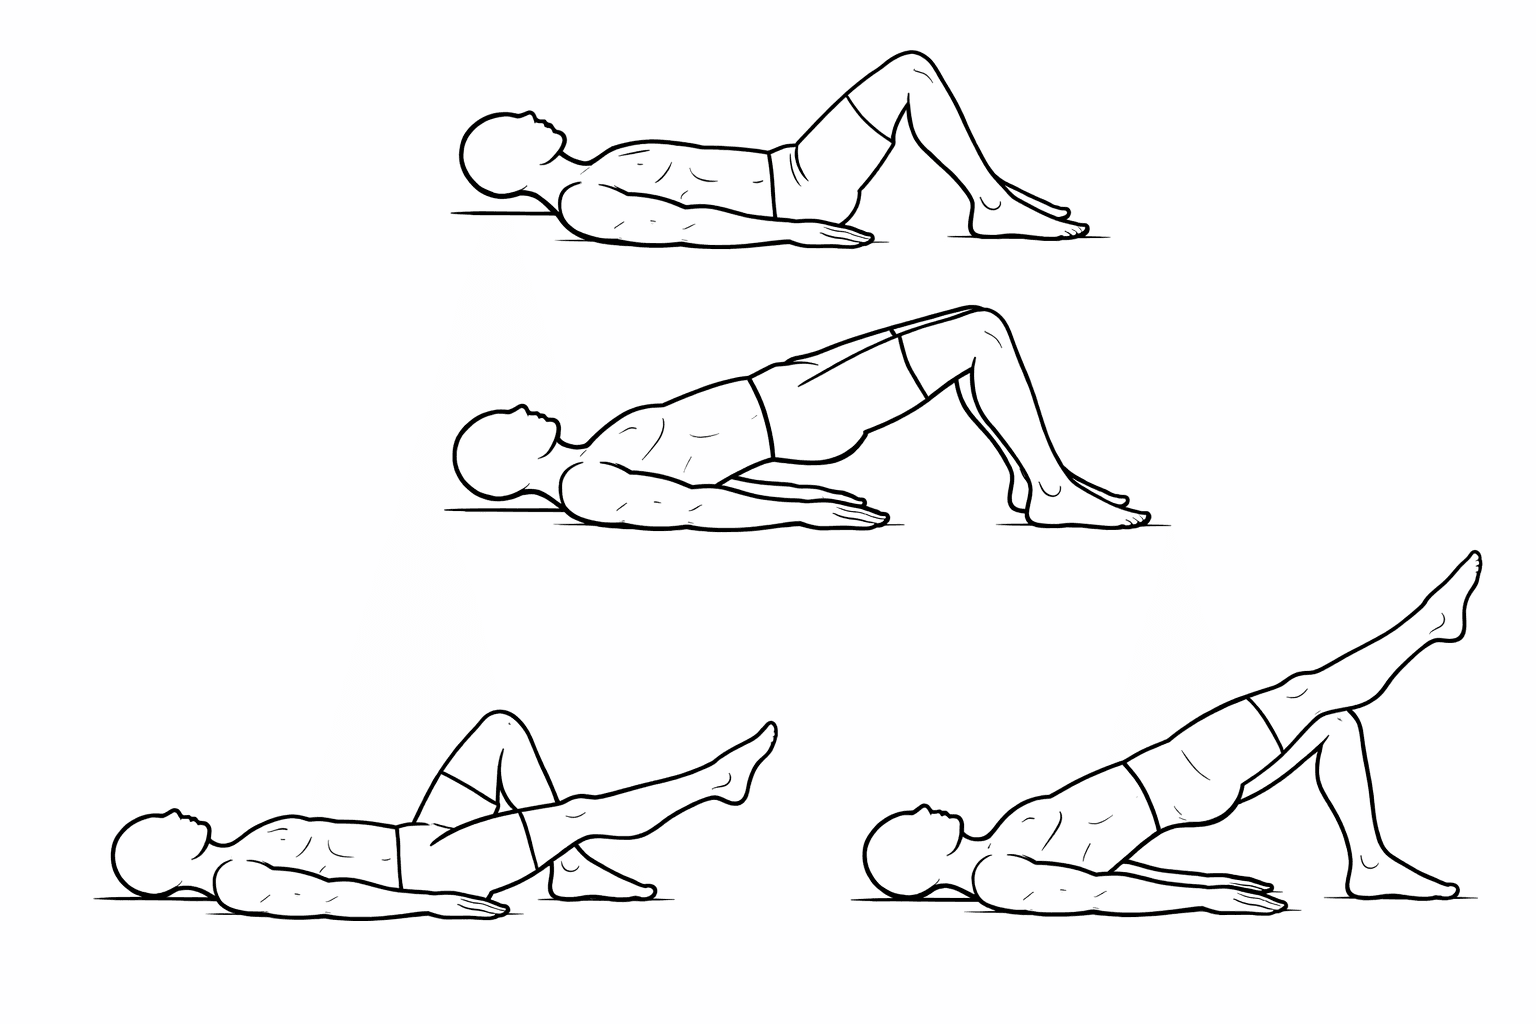
  10. Glute bridge (double-leg)

    Exercise 10

    Glute bridge (double-leg)

    2 × 8

    Neutral top: do NOT hyperextend

    How to do it
    1. 1Lie on your back with both knees bent and feet flat on the floor, about hip-width apart.
    2. 2Gently brace your core and squeeze your glutes, then push through your heels to lift your hips until your body forms a straight line from shoulders to knees.
    3. 3Pause briefly at the top, and then lower your hips back down with control and repeat for the prescribed number of repetitions.
    4. 4If this motion is too easy, then perform with a single leg.

    Why this exercise

    A strong back is best complemented by strong hips and legs. Glute bridges train hip extension, so your lower back can remain stable as your glutes and legs do the heavy lifting.

    Make it easier

    • No pause at the top
    • Bring your feet a bit closer to your bum

    Make it harder

    • Add a 2-3 second pause at the top
    • Single-leg glute bridge
    • Hip thrust
    • Single-leg hip thrust
    • Add resistance by placing a weight on your pelvis

Something not feeling right?